- Original guide
- Beginner friendly
- Updated 2026
- Affiliate disclosed
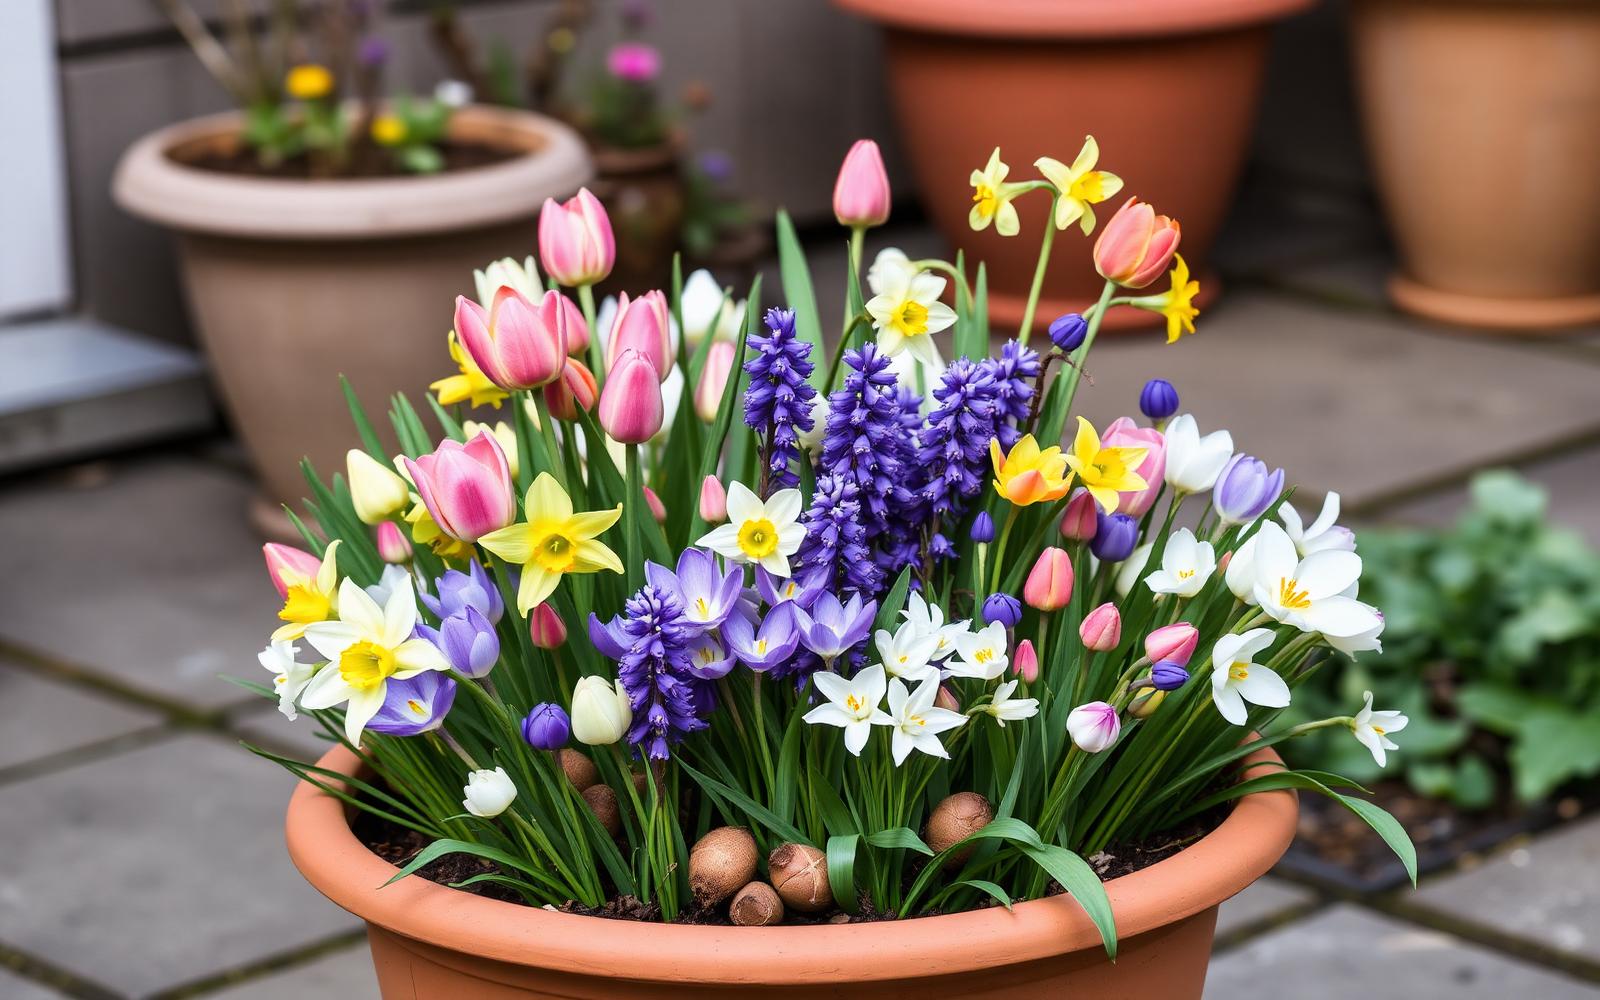
What is a bulb lasagne?
A bulb lasagne is a method of layering spring bulbs in a single pot at different depths, so the container produces a sequence of flowers from late winter into late spring. The name comes from the layered way the bulbs are planted, like the layers of a baked lasagne, rather than from anything to do with food. It is also widely spelled bulb lasagna, especially in the US, but the spelling does not change the technique.
The method is most often used for spring-flowering bulbs planted in autumn. A typical pot will combine two or three kinds of bulb, with the largest and latest-flowering ones in the lowest layer and the smallest, earliest ones near the top. As each layer comes into bloom in turn, the pot keeps producing colour for many weeks instead of giving one short burst from a single planting.
Bulb lasagne pots suit patios, balconies, front steps, small gardens and any spot where there is room for a container but not for a wide border. A well-planned pot can sit by a front door, on a kitchen step, by a garden seat or at the edge of a small terrace, and earn its place from the first crocus all the way through to the last tulip.
Both spellings refer to the same idea
Best bulbs for a bulb lasagne
The most reliable bulb lasagne pots use a mix of larger, later bulbs for the lowest layer, mid-season bulbs for the middle and small early bulbs near the top. The table below compares the bulbs most commonly used in layered spring containers. On desktop you get the full comparison, and on mobile each row becomes a stacked card so nothing scrolls sideways.
| Bulb | Layer | Bloom time | Depth | Pot use | Level | Why it works |
|---|---|---|---|---|---|---|
| Tulips | Bottom | Mid to late spring | Deep | Statement pots, classic layered displays | Easy | Tall, colourful and reliable in the bottom layer of a generous pot. |
| Daffodils (large) | Bottom | Early to mid spring | Deep | Classic mid pot, sturdy backbone | Easy | Strong foliage and bright flowers hold the middle of the season. |
| Daffodils (miniature) | Middle | Early to mid spring | Medium | Small pots, layered displays | Easy | Smaller scale fits the upper layers without crowding tulips below. |
| Hyacinths | Middle | Mid spring | Medium | Fragrant pots near doorways | Easy | Dense flower spikes add bulk and strong fragrance. |
| Crocus | Top | Late winter to early spring | Shallow | Top layer of almost any pot | Easy | Earliest colour, perfect first wave above larger bulbs. |
| Muscari | Top | Early to mid spring | Shallow | Edges and top layers, small pots | Easy | Blue spikes fill gaps between larger bulbs and edge the pot. |
| Iris reticulata | Top | Late winter to early spring | Shallow | Small pots and top layers | Easy | Jewel-like early flowers on short stems suit the top layer. |
| Snowdrops | Top | Late winter | Shallow | Quiet early pots | Moderate | Best planted in the green, but a lovely first-wave layer when they take. |
| Alliums | Bottom | Late spring to early summer | Deep | Tall statement pots | Moderate | Extends the lasagne after the tulips finish, but needs a generous pot. |
| Anemone blanda | Top | Early to mid spring | Shallow | Soft carpets on the top layer | Moderate | Soak corms before planting and treat as a soft top-layer infill. |
| Scilla | Top | Early spring | Shallow | Small pots and top layers | Easy | Tiny nodding blue bells weave between other early bulbs. |
| Chionodoxa | Top | Early spring | Shallow | Small pots and top layers | Easy | Starry blue flowers pair well with muscari and crocus. |
Tulips
Bottom layer- Bloom
- Mid to late spring
- Depth
- Deep
- Pot use
- Statement pots, classic layered displays
- Level
- Easy
- Why
- Tall, colourful and reliable in the bottom layer of a generous pot.
Daffodils (large)
Bottom layer- Bloom
- Early to mid spring
- Depth
- Deep
- Pot use
- Classic mid pot, sturdy backbone
- Level
- Easy
- Why
- Strong foliage and bright flowers hold the middle of the season.
Daffodils (miniature)
Middle layer- Bloom
- Early to mid spring
- Depth
- Medium
- Pot use
- Small pots, layered displays
- Level
- Easy
- Why
- Smaller scale fits the upper layers without crowding tulips below.
Hyacinths
Middle layer- Bloom
- Mid spring
- Depth
- Medium
- Pot use
- Fragrant pots near doorways
- Level
- Easy
- Why
- Dense flower spikes add bulk and strong fragrance.
Crocus
Top layer- Bloom
- Late winter to early spring
- Depth
- Shallow
- Pot use
- Top layer of almost any pot
- Level
- Easy
- Why
- Earliest colour, perfect first wave above larger bulbs.
Muscari
Top layer- Bloom
- Early to mid spring
- Depth
- Shallow
- Pot use
- Edges and top layers, small pots
- Level
- Easy
- Why
- Blue spikes fill gaps between larger bulbs and edge the pot.
Iris reticulata
Top layer- Bloom
- Late winter to early spring
- Depth
- Shallow
- Pot use
- Small pots and top layers
- Level
- Easy
- Why
- Jewel-like early flowers on short stems suit the top layer.
Snowdrops
Top layer- Bloom
- Late winter
- Depth
- Shallow
- Pot use
- Quiet early pots
- Level
- Moderate
- Why
- Best planted in the green, but a lovely first-wave layer when they take.
Alliums
Bottom layer- Bloom
- Late spring to early summer
- Depth
- Deep
- Pot use
- Tall statement pots
- Level
- Moderate
- Why
- Extends the lasagne after the tulips finish, but needs a generous pot.
Anemone blanda
Top layer- Bloom
- Early to mid spring
- Depth
- Shallow
- Pot use
- Soft carpets on the top layer
- Level
- Moderate
- Why
- Soak corms before planting and treat as a soft top-layer infill.
Scilla
Top layer- Bloom
- Early spring
- Depth
- Shallow
- Pot use
- Small pots and top layers
- Level
- Easy
- Why
- Tiny nodding blue bells weave between other early bulbs.
Chionodoxa
Top layer- Bloom
- Early spring
- Depth
- Shallow
- Pot use
- Small pots and top layers
- Level
- Easy
- Why
- Starry blue flowers pair well with muscari and crocus.
A closer look at the most reliable bulbs
These short profiles cover the bulbs you are most likely to use in a layered spring pot. The images show the flowers, not the dormant bulbs, so you know what to expect when each layer takes its turn.
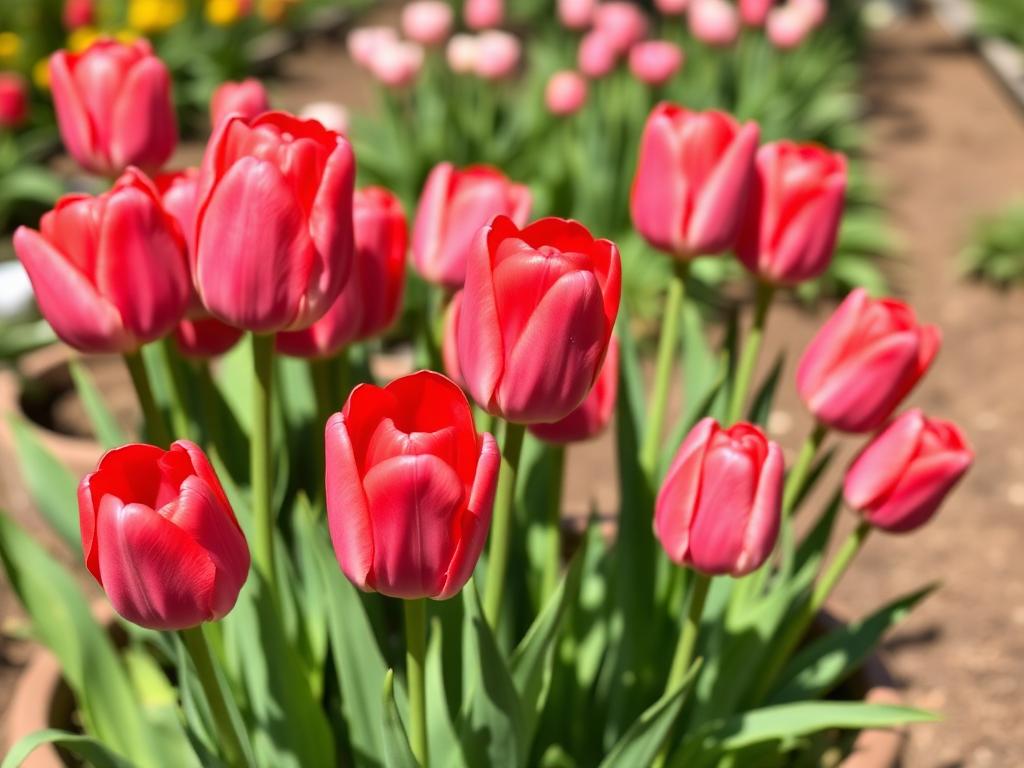
Tulips
Tulipa
- Layer
- Bottom
- Bloom
- Mid to late spring
The classic bottom layer for a bulb lasagne. Choose mid or late tulips to extend the season after the daffodils.
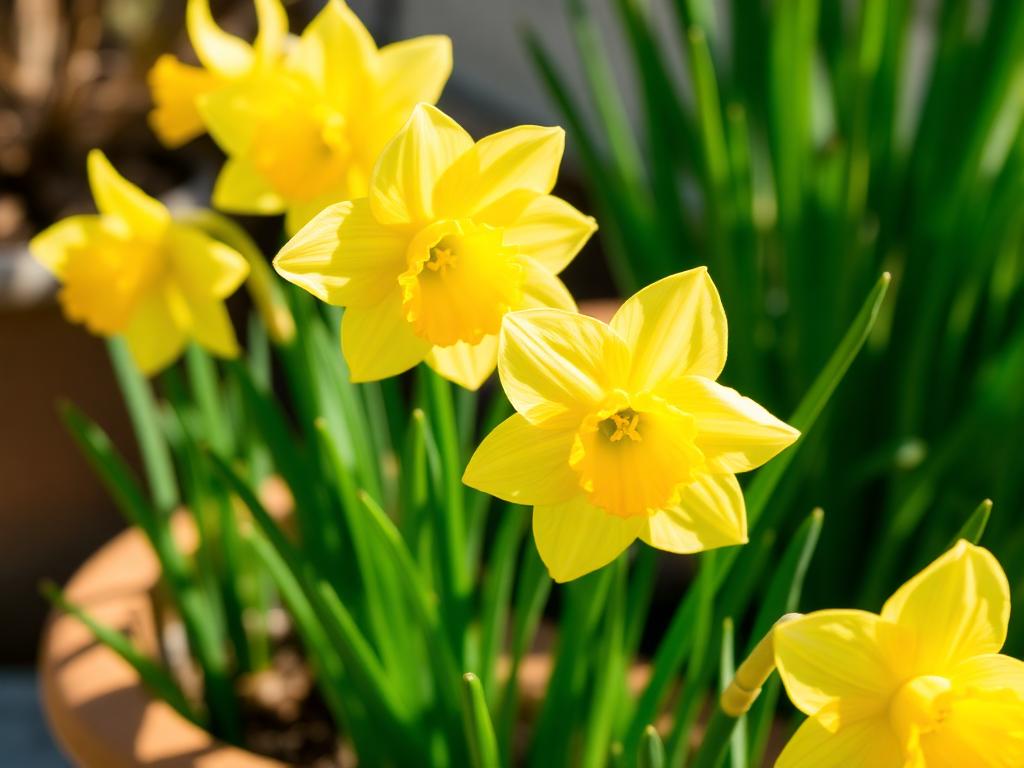
Daffodils
Narcissus
- Layer
- Bottom or middle
- Bloom
- Early to mid spring
Large daffodils suit the bottom or middle, miniature varieties sit comfortably in the upper layers.
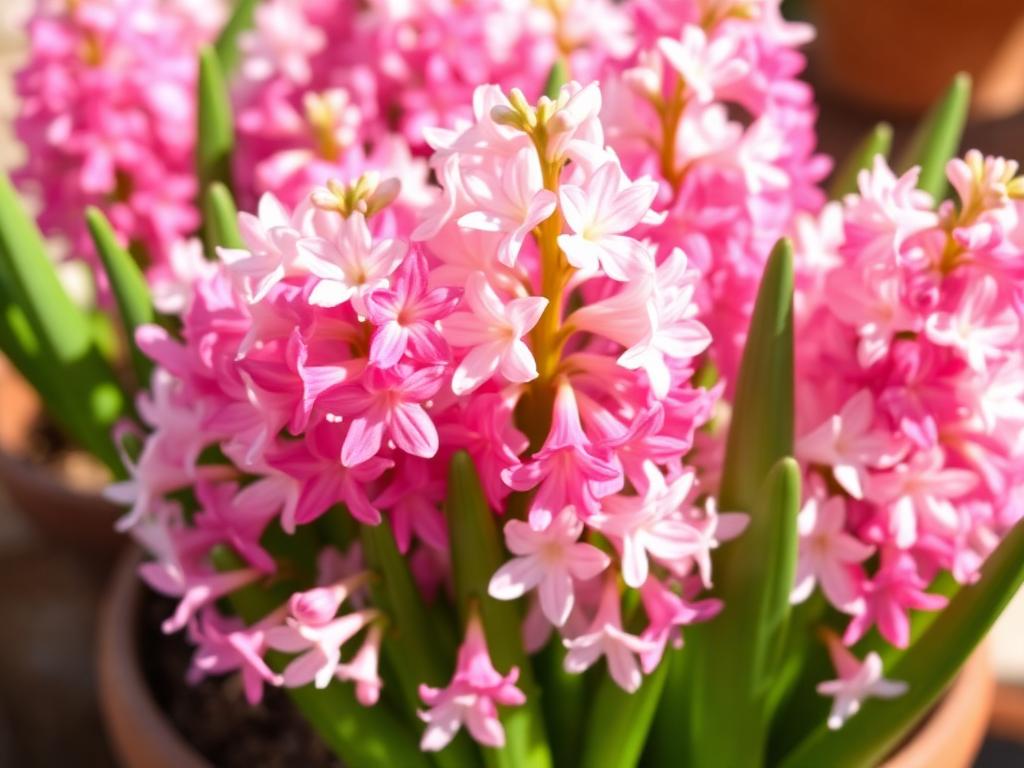
Hyacinths
Hyacinthus orientalis
- Layer
- Middle
- Bloom
- Mid spring
Dense, fragrant spikes that anchor the middle layer. Especially welcome by a doorway or window.
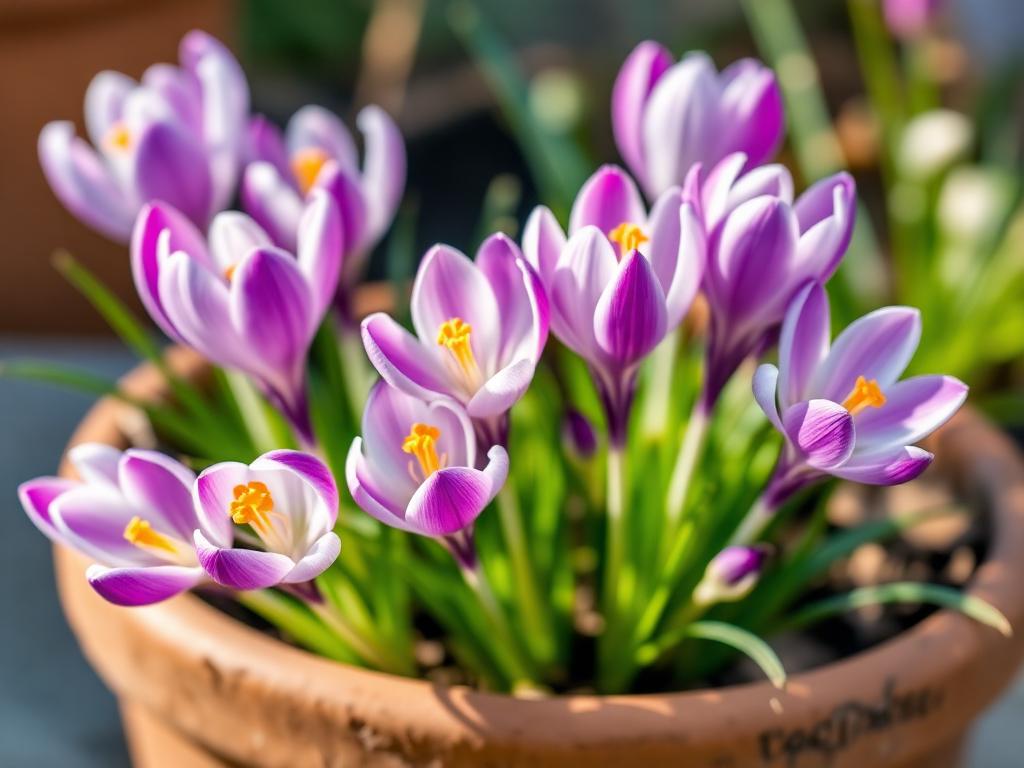
Crocus
Crocus
- Layer
- Top
- Bloom
- Late winter to early spring
One of the earliest layers. Pair with muscari for a long early wave above the bigger bulbs.
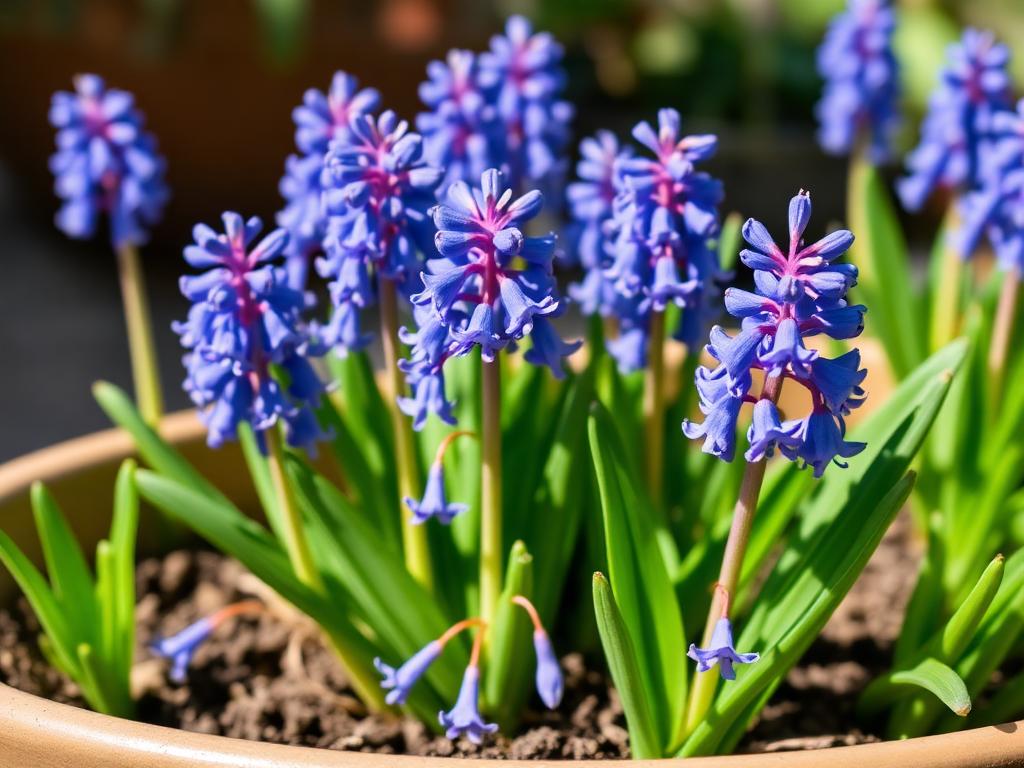
Muscari
Muscari armeniacum
- Layer
- Top
- Bloom
- Early to mid spring
Easy to grow and almost always reliable. The blue spikes link other early bulbs together.
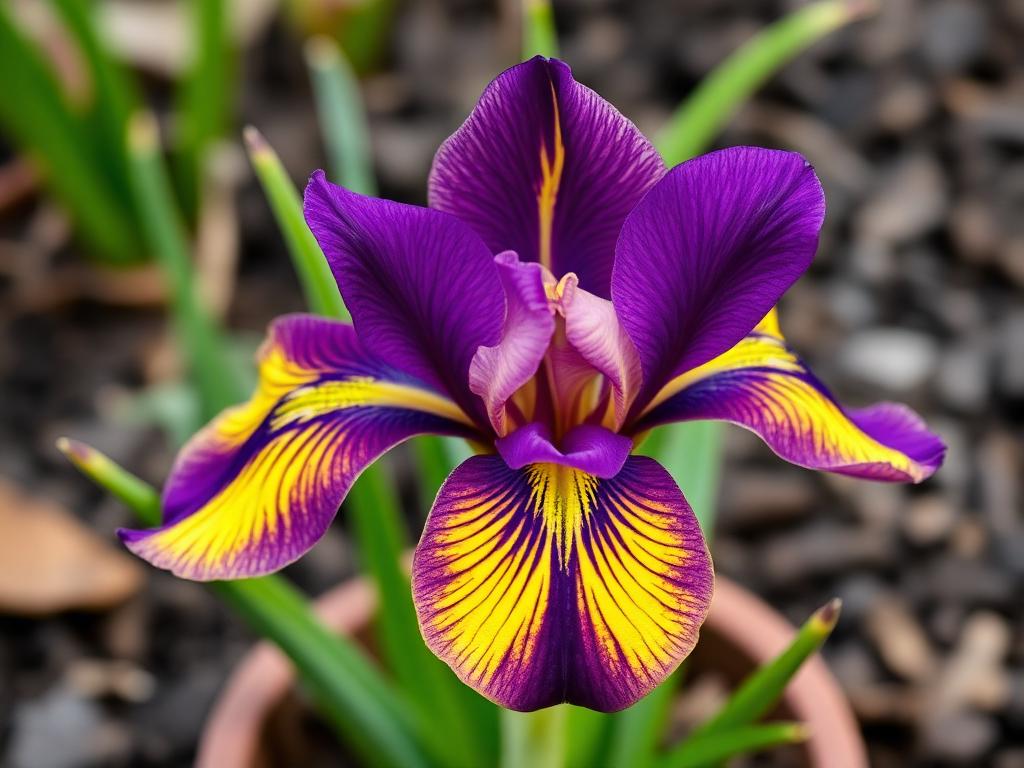
Iris reticulata
Iris reticulata
- Layer
- Top
- Bloom
- Late winter to early spring
Jewel-like early flowers on short stems, well suited to the top of a smaller lasagne pot.
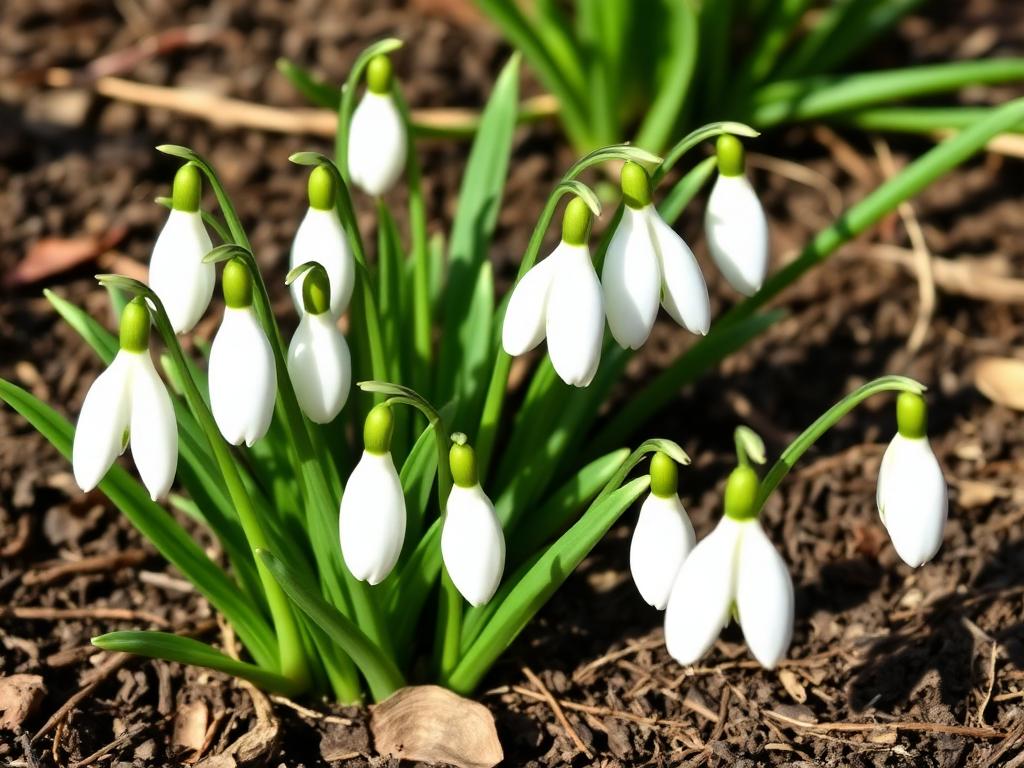
Snowdrops
Galanthus nivalis
- Layer
- Top
- Bloom
- Late winter
Often easier to establish from in-the-green plants than from dry bulbs. Try a small clump near the surface.

Alliums
Allium
- Layer
- Bottom
- Bloom
- Late spring to early summer
Extend the season after the tulips finish. Use only in a generous, deep pot where they have room.
Anemone blanda
Anemone blanda
- Layer
- Top
- Bloom
- Early to mid spring
Daisy-like flowers that soften the top layer. Soak the corms overnight before planting.

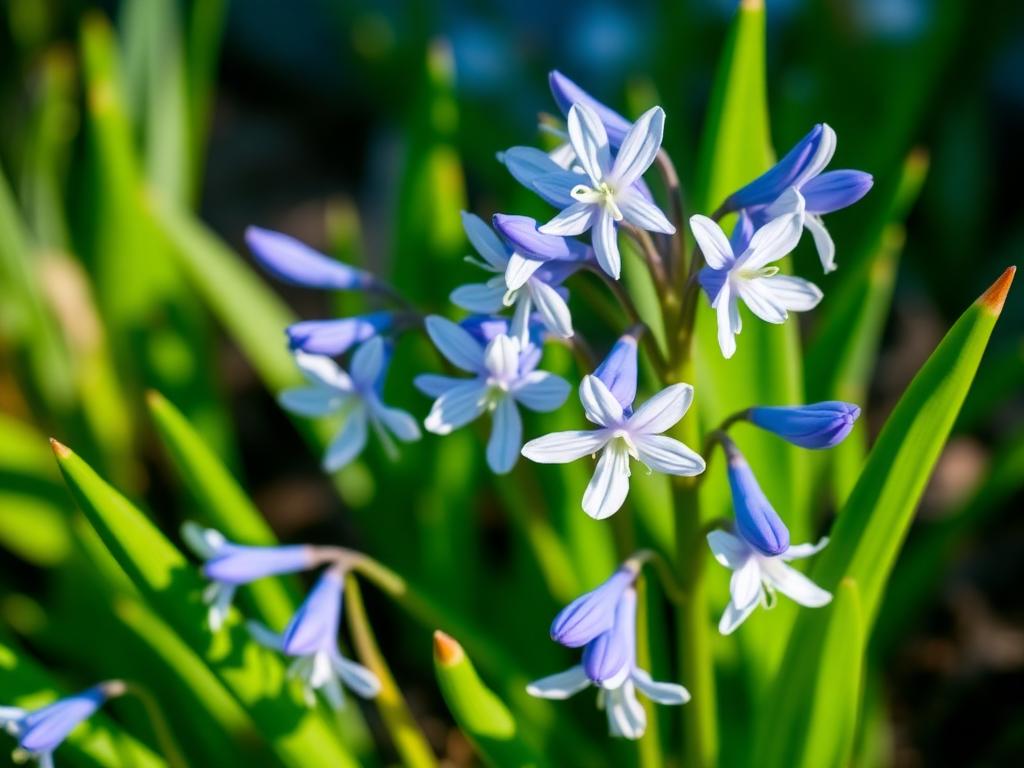
Scilla
Scilla siberica
- Layer
- Top
- Bloom
- Early spring
Small nodding blue bells that weave between crocus and muscari on the top layer.
Chionodoxa
Chionodoxa
- Layer
- Top
- Bloom
- Early spring
Starry blue and white flowers that mix well with other small early bulbs.
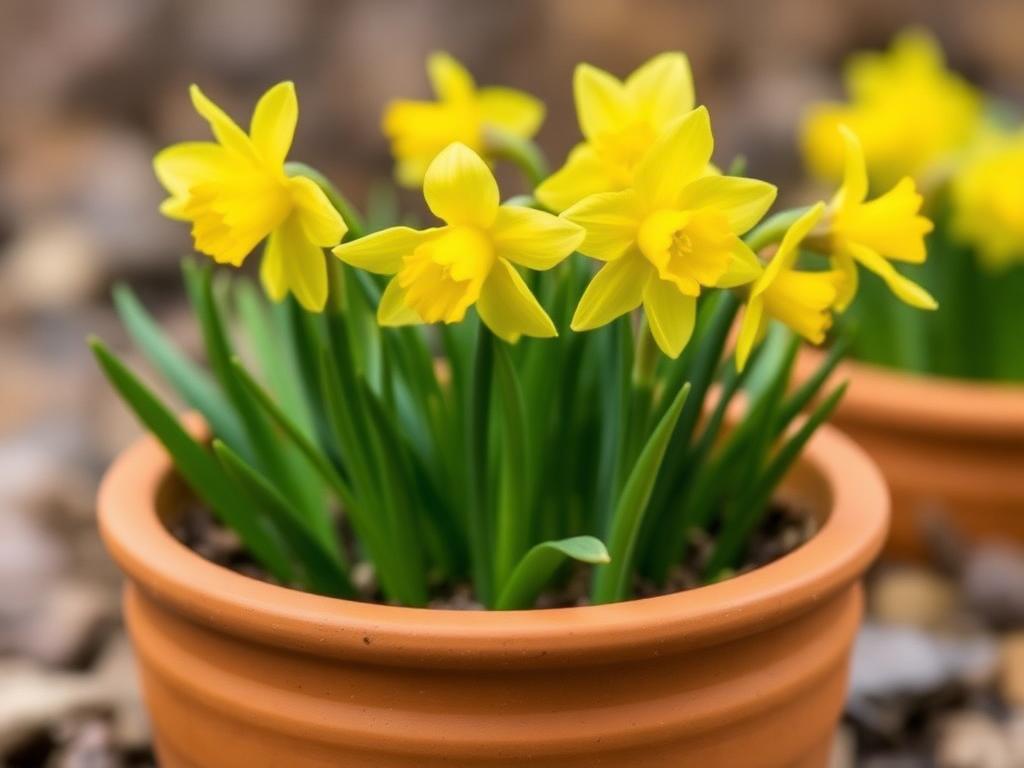
Miniature narcissus
Narcissus 'Tete a Tete'
- Layer
- Middle or top
- Bloom
- Early to mid spring
A smaller-scale daffodil that fits neatly in the middle or upper part of a layered pot.
Bulb lasagne layer order
The layer order is the most important part of the technique. The lowest layer usually holds the largest bulbs or the bulbs that need the most depth. The middle layer carries the mid-season bulbs. The top layer holds the smallest, earliest bulbs. Each layer is separated by a layer of compost so the bulbs are not sitting on top of each other.
Bottom layer
Tulips, large daffodils and larger alliums (where the pot is generous enough) sit in the bottom layer. These bulbs need depth for their roots, and they tend to flower later, so they have time to push up through the upper layers without colliding with smaller bulbs that have already finished.
Middle layer
Smaller daffodils, hyacinths and smaller tulips sit in the middle layer. They take over the season from the early bulbs and bridge the gap to the late tulips below.
Top layer
Crocus, muscari, iris reticulata, snowdrops, scilla, chionodoxa and anemone blanda sit near the surface. These are the earliest bulbs in a typical lasagne, often appearing in late winter or very early spring before the larger bulbs have woken up.
Layer diagram
A bulb lasagne pot from top to base
Top of pot
Small early bulbs
Crocus, muscari, iris reticulata, snowdrops, scilla, chionodoxa, anemone blanda
Middle
Mid-season bulbs
Smaller daffodils, hyacinths, smaller tulips
Bottom
Large or later-flowering bulbs
Tulips, large daffodils, larger alliums where suitable
Base
Drainage holes and potting mix
A layer of free-draining potting mix sits above the drainage holes so water can leave the pot.
Stagger bulbs, do not stack them
When to plant bulb lasagne pots
Most spring bulb lasagne pots are planted in fall. The exact window depends on climate, but the rough idea is to plant once the worst of the summer heat has passed and before the ground freezes hard. Daffodils, crocus, muscari and hyacinths are usually planted earlier in autumn, while tulips often benefit from cooler conditions a little later in the season.
In mild climates, avoid planting too early in hot soil, since warm conditions can push bulbs into early shoot growth before winter chill has done its work. In very cold climates, plant in good time before the soil freezes hard, and protect pots from repeated freeze and thaw cycles which can damage compost and roots. Always check the recommended planting window for your area, since the same calendar dates can mean different things in different zones.
If you are buying bulbs as a kit or pre-packed lasagne collection, plant them at the timing the supplier suggests for your region. If you are mixing your own, plant the whole pot in one session rather than spreading planting across many weeks, so all bulbs settle and chill on a similar schedule.
Best pot, compost and drainage
A good bulb lasagne container needs depth, drainage and enough stability to stand through winter. The pot does not have to be expensive, but it does have to give the bulbs room to root and let excess water escape.
What to look for in a bulb lasagne pot
- A depth of at least 30 to 40 centimetres so there is room for three layers plus compost.
- Genuine drainage holes in the base, not just decorative dimples.
- A heavy, stable pot that will not blow over in winter wind.
- A diameter wide enough to space bulbs comfortably in each layer.
- A free-draining peat-free potting mix rather than heavy garden soil.
- A small gap of two to three centimetres at the top for watering without overflow.
- Frost-proof material if the pot is staying outside in cold winters.
- An option to lift or move the pot, especially if it will be heavy when planted.
For compost, a good quality multipurpose mix is fine for most bulb lasagne pots. Avoid heavy clay garden soil that holds too much water, and avoid very light, fluffy mixes that dry out fast and shrink away from the sides of the pot. Some gardeners add a little grit to the lowest layer to improve drainage, especially for tulips. There is no need to fill the base with crocks or gravel as a routine practice. A well-chosen pot with a real drainage hole is usually enough.
Depth makes everything easier
How to plant a bulb lasagne step by step
The process is simple once the pot, compost and bulbs are gathered. Plant the whole pot in one session, work from the bottom layer upward, and keep the compost between layers level so each bulb sits at a sensible depth.
Step-by-step lasagne bulb planting
- Choose a deep pot with real drainage holes in the base.
- Add a layer of free-draining potting mix to the base of the pot.
- Place the lowest bulb layer, such as tulips or large daffodils, pointy end up.
- Cover with enough compost so the next bulb layer will sit at the right depth.
- Add the middle bulb layer, such as smaller daffodils, hyacinths or smaller tulips.
- Cover again with compost, keeping the layer level.
- Add the top layer of small bulbs such as crocus, muscari, iris reticulata or snowdrops.
- Fill to within two to three centimetres of the rim and firm gently.
- Water lightly once so the compost settles around the bulbs.
- Label the pot with bulb names and the planting date.
- Place the pot in a cool, sheltered outdoor spot for the winter.
- Move it into view once shoots appear and the first flowers open.
Pointy end up, but do not panic
Bulb lasagne combinations to try
The most successful lasagne pots use bulbs that follow on from each other rather than crowding the same week. Each combination below is a starting point, not a strict recipe. Adjust the colours, scale and bloom times to suit your own pot and climate.
Classic spring pot
The all-round starter combination.
- Bottom. Tulips, mid to late season.
- Middle. Daffodils, large or mid-sized.
- Top. Crocus or muscari for early colour.
- Best pot
- Deep pot around 35 to 40 cm wide and deep.
- Why
- Three reliable bulb types in three clear waves, with familiar shapes and colours that suit almost any garden.
- Beginner
- The easiest first lasagne. Stick to one or two tulip colours rather than a confetti mix.
Fragrant pot
Best near a door or seat where you can enjoy the scent.
- Bottom. Tulips, mid to late season.
- Middle. Hyacinths in a mix of pinks, blues or whites.
- Top. Muscari to fill in between the hyacinths.
- Best pot
- Wide pot around 35 cm wide, near a door, step or window.
- Why
- Hyacinths carry the perfume, muscari hold the colour around them, tulips finish the season.
- Beginner
- Wear gloves when planting hyacinths. Their papery skins can irritate sensitive hands.
Small-space pot
Fits comfortably on a balcony or step.
- Bottom. Dwarf daffodils such as Tete a Tete.
- Middle. Iris reticulata for short, vivid early colour.
- Top. Crocus in matching tones.
- Best pot
- Compact pot around 25 to 30 cm with real drainage.
- Why
- All three bulbs stay small, so the pot looks balanced and never gets top-heavy.
- Beginner
- Use fewer bulbs than you expect. A small pot reads better when each bulb has space.
Blue and yellow pot
A bright, cheerful late winter and spring scheme.
- Bottom. Yellow tulips.
- Middle. Yellow or cream daffodils.
- Top. Muscari for clean blue at the surface.
- Best pot
- Deep pot around 35 cm, ideally a plain colour so the bulbs lead.
- Why
- Yellow and blue are an easy garden pairing that looks fresh in late winter light.
- Beginner
- Pick one yellow tulip variety rather than mixing several. Simpler usually wins here.
White spring pot
Calm and quietly elegant by a front door.
- Bottom. White tulips, mid to late season.
- Middle. White narcissus such as Thalia.
- Top. White crocus or snowdrops near the surface.
- Best pot
- Plain pot in stone, terracotta or muted grey, around 35 cm.
- Why
- A single-colour pot reads as deliberate and seasonal, not accidental.
- Beginner
- Snowdrops are easier from in-the-green plants. Substitute white crocus if you only have dry bulbs.
Long-season pot
Stretches colour from late winter into late spring.
- Bottom. Late tulips.
- Middle. Daffodils for the middle wave.
- Top. Crocus, muscari or iris reticulata for the earliest weeks.
- Best pot
- Deep pot at least 35 to 40 cm, since four bulb types need room.
- Why
- Stacking early, mid and late bulbs gives the longest possible run from one pot.
- Beginner
- Resist adding a fifth bulb type. The pot will already be working hard.
Big statement pot
A generous pot for a porch, garden corner or front step.
- Bottom. Tall tulips, mid to late season.
- Middle. Large daffodils and hyacinths for fragrance and bulk.
- Top. Muscari to weave between the larger bulbs at the surface.
- Best pot
- Wide, heavy pot at least 40 cm wide and deep, frost proof.
- Why
- A bigger pot lets you scale up height, fragrance and impact without overcrowding any layer.
- Beginner
- Plant it where it can stay put. Big bulb pots are heavy once watered and hard to move.
Bloom time matters as much as colour
How deep to plant bulbs in pots
Depth varies by bulb type. In containers, bulbs are sometimes planted slightly closer together than in open ground, but they still need enough compost above and below to root well and stay supported. Large bulbs need deeper layers. Small bulbs can sit near the top with only a few centimetres of compost above them. Where the packet gives a specific depth, that is the most reliable guide.
| Bulb type | Typical layer | Approximate depth | Spacing note | Important tip |
|---|---|---|---|---|
| Tulips | Bottom | Around 15 to 20 cm in a lasagne pot | A few centimetres apart | Plant pointy end up. Avoid bulbs touching the pot wall. |
| Daffodils (large) | Bottom or middle | Around 12 to 18 cm in a lasagne pot | A few centimetres apart | Choose firm bulbs with no soft spots. |
| Hyacinths | Middle | Around 10 to 15 cm in a pot | Around 5 to 8 cm apart | Wear gloves, hyacinth bulbs can irritate skin. |
| Crocus | Top | Around 5 to 8 cm in a pot | Close together for impact | Plant in small clusters rather than a strict grid. |
| Muscari | Top | Around 5 to 8 cm in a pot | Close together | Good as edging around the top layer. |
| Iris reticulata | Top | Around 5 to 10 cm in a pot | A few centimetres apart | Looks best in small groups, not single bulbs. |
| Snowdrops | Top | Around 5 to 8 cm in a pot | Close together | Often easier from in the green plants than from dry bulbs. |
| Alliums | Bottom | Around 15 to 20 cm in a generous pot | Several centimetres apart | Use a wide, deep pot since allium leaves can be untidy. |
Tulips
- Layer
- Bottom
- Depth
- Around 15 to 20 cm in a lasagne pot
- Spacing
- A few centimetres apart
- Tip
- Plant pointy end up. Avoid bulbs touching the pot wall.
Daffodils (large)
- Layer
- Bottom or middle
- Depth
- Around 12 to 18 cm in a lasagne pot
- Spacing
- A few centimetres apart
- Tip
- Choose firm bulbs with no soft spots.
Hyacinths
- Layer
- Middle
- Depth
- Around 10 to 15 cm in a pot
- Spacing
- Around 5 to 8 cm apart
- Tip
- Wear gloves, hyacinth bulbs can irritate skin.
Crocus
- Layer
- Top
- Depth
- Around 5 to 8 cm in a pot
- Spacing
- Close together for impact
- Tip
- Plant in small clusters rather than a strict grid.
Muscari
- Layer
- Top
- Depth
- Around 5 to 8 cm in a pot
- Spacing
- Close together
- Tip
- Good as edging around the top layer.
Iris reticulata
- Layer
- Top
- Depth
- Around 5 to 10 cm in a pot
- Spacing
- A few centimetres apart
- Tip
- Looks best in small groups, not single bulbs.
Snowdrops
- Layer
- Top
- Depth
- Around 5 to 8 cm in a pot
- Spacing
- Close together
- Tip
- Often easier from in the green plants than from dry bulbs.
Alliums
- Layer
- Bottom
- Depth
- Around 15 to 20 cm in a generous pot
- Spacing
- Several centimetres apart
- Tip
- Use a wide, deep pot since allium leaves can be untidy.
The exact figures depend on the bulb variety and the depth of your pot. If the packet recommends a planting depth, treat that as the starting point and adjust slightly for your container.
How to care for bulb lasagne pots through winter and spring
Bulb lasagne pots are not high maintenance, but they do reward steady attention through the colder months. The aim is to keep the compost moist but not soggy, protect the pot from extreme weather and let nature do most of the work.
Watering after planting
Water lightly after planting so the compost settles around the bulbs. After that, water only when the top of the compost feels dry, and avoid soaking the pot. Cold, wet compost is the most common cause of bulb rot in winter containers.
Winter placement
Keep the pot outside or in a cool sheltered place where the bulbs can chill naturally, depending on climate. Most spring bulbs need a cold spell to flower well, so a warm porch or heated greenhouse is not the right home in winter.
Protecting from heavy rain
Move pots out of constant winter rain if the compost stays soggy. A spot under the eaves or against a wall is often enough. The aim is not to keep the pot bone dry, just to stop it sitting in water for weeks at a time.
Protecting from freezing
In very cold climates, protect containers from repeated freeze and thaw cycles which can damage compost and roots. Wrapping the outside of the pot with fleece or moving it into an unheated shed during the coldest spells can help. The bulbs themselves can usually cope with cold, but a small thin pot freezes solid faster than a large heavy one.
Moving pots into display
Move the pot to a visible place once shoots appear, so you can enjoy each wave of flowers. A bulb lasagne earns its keep in the weeks it is in bloom, and being in view of a door, window or seat makes a real difference.
Feeding
Once growth starts, a gentle liquid feed can help bulbs recover energy, especially if you plan to keep them for next year. Feed while the leaves are still green and healthy, and stop when the foliage begins to yellow.
Common bulb lasagne mistakes
Using a shallow pot
Why it causes problems. Three layers of bulbs simply do not fit comfortably in a shallow container. Bulbs end up squeezed against each other and against the pot base.
Better approach. Choose a pot at least 30 to 40 centimetres deep so each layer has room for compost above and below.
No drainage holes
Why it causes problems. Bulbs cannot tolerate sitting in wet, airless compost for weeks. Without drainage, water collects in the base and rots the lower layers first.
Better approach. Use a pot with real drainage holes, and stand it on pot feet or a stand if it sits on a flat surface.
Overcrowding bulbs
Why it causes problems. Cramming in as many bulbs as possible looks generous on planting day, but the bulbs compete for moisture and air, and the display often disappoints.
Better approach. Leave a small gap between each bulb in every layer. Quality of spacing beats quantity of bulbs.
Planting all bulbs at the same depth
Why it causes problems. Without layering, you lose the wave effect entirely. The pot blooms briefly and then sits empty for most of the season.
Better approach. Plant in clear layers with compost between them so each group flowers in turn.
Choosing bulbs that bloom at awkward times
Why it causes problems. If every bulb flowers in the same fortnight, the pot peaks once and then collapses into spent stems and yellow leaves.
Better approach. Check bloom times on each packet and build the pot from early, mid and late season bulbs.
Letting the pot sit in winter rain
Why it causes problems. Long spells of cold rain saturate the compost, push out air and encourage rot, especially in the lower layers.
Better approach. Move the pot under shelter during heavy winter rain, or keep it in a spot where the compost can drain freely.
Forgetting to label the pot
Why it causes problems. By midwinter you may not remember which bulbs went where. That makes feeding, replanting and planning next year far harder.
Better approach. Write the bulb varieties and the planting date on a simple label and push it into the rim of the pot.
Planting tulips too early in warm climates
Why it causes problems. Tulips planted in warm soil can start into growth too soon and miss the chill they need for a strong display.
Better approach. Wait for cooler conditions later in autumn, and follow planting windows for your specific region.
Using bulbs that are soft, moldy or damaged
Why it causes problems. A weak bulb is unlikely to flower well, and rotting bulbs can affect the others around them in a packed pot.
Better approach. Check each bulb before planting. Firm, dry and intact is the standard. Discard any that feel soft or smell off.
Expecting every bulb to return strongly the next year
Why it causes problems. Tulips in particular often weaken after the first year in a pot, and a packed lasagne is a demanding environment for bulbs.
Better approach. Treat tulips as a one-season pot display where needed, and keep the more reliable bulbs for replanting in the garden.
Drainage matters more than anything else
What to do after flowering
Once each wave of flowers has finished, gentle aftercare gives the bulbs their best chance for next year and keeps the pot looking tidy. The choices are simple, and the most important one is to leave the green leaves alone until they have done their job.
After-flowering checklist
- Remove spent flowers but not the green leaves below them.
- Let the foliage die back naturally so the bulbs can store energy.
- Feed gently with a balanced liquid feed while leaves are still green.
- Move the pot out of sight while foliage yellows if it bothers you.
- Replant suitable bulbs into the garden once foliage has died back.
- Treat tulips as one-season container bulbs if they weaken after the first year.
- Refresh the potting mix before replanting bulbs into the same pot next season.
- Compost spent compost rather than reusing it for new bulb pots.
Green leaves are the next year's flowers
Useful supplies for bulb lasagne pots
You do not need much equipment for a bulb lasagne. A good pot, decent compost and firm bulbs do most of the work. The categories below cover the supplies that are most worth having on hand. Links are placeholders only.
Best beginner bulb lasagne recipe
The first lasagne is usually the most enjoyable when it is kept simple. Three layers are enough. Use bulbs that are widely available, easy to handle and forgiving of small mistakes. The two pots below are gentle starting points rather than strict rules.
Beginner classic pot
A deep pot with three reliable layers
- Deep pot with real drainage holes
- Bottom layer: 5 to 7 tulips
- Middle layer: 5 to 7 daffodils or hyacinths
- Top layer: 10 to 15 crocus or muscari
- Free-draining potting mix between layers
- Light watering after planting
- Cool outdoor winter position
- Move into view when shoots appear
Small-space pot
A compact pot for a balcony or step
- Bottom layer: dwarf daffodils such as Tete a Tete
- Middle layer: iris reticulata
- Top layer: crocus or muscari
- Smaller, lighter pot with drainage
- Lighter watering through winter
- Suited to a step, balcony or window ledge
Beginners should keep the first bulb lasagne simple. Three layers, three kinds of bulb and a good pot will teach almost everything the next pot needs. Once you have lived with one season of waves, you will know exactly how to push the next pot a little further.
Frequently asked questions
What is bulb lasagne?
Is bulb lasagne the same as bulb lasagna?
What bulbs are best for bulb lasagne?
What order do you layer bulbs in pots?
How deep should a bulb lasagne pot be?
When should you plant a bulb lasagne?
Can you plant tulip bulbs in pots?
Can you plant daffodil bulbs in pots?
Do you water bulb lasagne after planting?
Can bulb lasagne pots stay outside in winter?
How many bulbs can you put in one pot?
Can you reuse bulb lasagne bulbs next year?
What should you do with bulb lasagne after flowering?
Why did my bulb lasagne fail?
Final advice
A successful bulb lasagne is more about restraint than packing in bulbs. Use a deep pot with real drainage. Plant larger bulbs lower and smaller early bulbs higher. Separate every layer with compost. Resist the urge to overcrowd. Match the bulbs by bloom time, height and colour, not just by what looks generous on planting day. Keep the pot cool and not waterlogged through winter, and let the leaves die back naturally after each flower has finished. A simple three-layer bulb lasagne, planned well and looked after gently, is almost always more rewarding than an overfilled container that gives one short burst and then collapses.
Related reads
Keep reading
- HubPots and containers — guides for patio gardeningContainer ideas for patios, balconies and small gardens, from pot choice to year-round planting schemes.Read guide
- HubPlants for every garden and situationBrowse plant guides by leaf, colour, light, climate and intended use.Read guide
- HubGarden design guides and ideasLong form articles on structure, planting style, evergreens, borders and small space planning.Read guide
- HubTools and products for everyday gardeningEditor categories for pruners, shears, planters, watering kit and seasonal supplies.Read guide
- Plant guideLime green plants for shaded borders and bright accentsChartreuse foliage and flowers to lift dark corners and pair with spring bulbs.Read guide
- Plant guideLarge leaved plants for indoors and shady bordersBold foliage plants that pair well with the simple sculptural look of layered bulb pots.Read guide